01 May 2014

What's blooming in the garden today?

Here I have Sweet Alyssum in a hanging basket that I crafted.  I would say that I made it, but really, I just searched until I found some bowls I liked and figured out an attractive way to tie on my rope.  Then, I sewed through the rope to ensure the knots' security.  As for the Alyssum, the purple and lavender varieties you see in the foreground don't have a scent, or at least, not much of one.  I always plant the traditional white kind for their beautiful fragrance.  I can't get enough of it, so I always plant an assortment.


Sure, I know this technically hasn't bloomed yet, but this Snapdragon is a survivor.  I'm so proud and ready for the blossoms to open.


Since I got a pass earlier with the Snapdragon, I decided to push my luck with some purple Coleus.  This is a rooted cutting of a plant I got at the Master Gardeners Plant Sale last May.  I'm always interested in showy foliage, and am thrilled to have discovered that I can keep it around longer than just a few seasons.  It is almost as good as having flowers!


This is one of my first Confederate Jasmine buds to open.  I can't wait for the plants to really get into the groove.  They're by the screen door that opens into the kitchen, and their perfume is absolutely lovely.


This one from the pack of 6 purple Dianthus plants that I bought after an unseasonably late freeze from Lowes for $0.99!  It has recovered nicely.


I've had these cinnamon scented double bloomed Dianthus plants since last March and really need to divide them.  They've held up remarkably well and have been in constant bloom since I planted them.  What a good choice. :)


Here is the first Johnny Jump Up that has bloomed since I scattered the seeds in March.  I'm hoping many more will appear.  They're looking pretty scraggly because they're directly in the path Ria takes to harass the birds at their feeder.  I'd feel sorry for the birds, but they're getting a free lunch. And dinner.  And snack.  I go through a lot of bird feed.


I just love poppies.  I've scattered 4 different varieties throughout my garden, and am thrilled to have had this beauty bloom first.  She's not quite open yet, but tomorrow will be gorgeous.  Too bad I won't be here to take pictures.  I'll be in Austin for thrifting and fabric shopping.


My Mexican Heather is still very small, but is blooming nicely.  The flowers are small, but I enjoy them so much--even more because it is such a fuss free plant to grow here in central Texas.


The cherry tomatoes are on their way to a good start, having finally overcome their fungal issues.  This year I've only planted cherries, since last year I had such a terrible time with my large heirloom varieties.  Hopefully they'll produce prolifically and will prove to have been a good choice.


These pansies have survived since last fall and are still going strong.  They smell heavenly, and despite being in an ugly hanging basket have cheered me up many a day.


I'll end with some of the ever present Verbena that just can't get enough sun.  This is a super tough plant, and I can't recommend it enough.  Sure, mine looks scraggly at the moment, but I'll add more to the pot when I come across it on friendly property.

12 February 2014

Pan Seared Brussels Sprouts with Bacon and Chestnuts

This is my adaptation of Gordon Ramsay's recipe.  I made these to accompany my Kabocha Risotto.  It is super quick and easy, but also is impressive enough to serve to company.  If you're not fond of brussels sprouts, this method of preparing them may just change your mind.

This recipe is delicious even without the chestnuts.  The sprouts will still want some kind of sweetness, so just add a bit of sugar as you're searing them.  You can also experiment with using an acid other than lemon juice at the end.  I'm fond of using apple cider vinegar if I don't have lemons on hand.


Seared Brussels Sprouts with Bacon and Chestnuts
You can see Kabocha Risotto in the background.


Ingredients:
Brussels Sprouts
3 pieces of thick cut bacon cut into 1 cm wide strips.
at least 5 large peeled, chopped chestnuts
1 lemon
Butter
Salt
Pepper

Equipment:
Spatula
Iron Skillet
Knife
Cutting Board


  1. To prepare the brussels sprouts, cut off the bottom of each sprout, peel away the outer leaves, then cut the larger ones in half.  If the sprouts are small enough, leave them whole.  You're trying to make everything roughly the same size, so it will all cook evenly.
  2. Heat a pot of salted water until boiling, then blanch the prepared sprouts for 2 minutes.  
  3. Simultaneously, heat your iron skillet, melt the butter, and fry the bacon until it is crispy.  Add a sprinkle of salt and pepper.
  4. Add the sprouts directly to the skillet with a slotted spoon and sear them. 
  5. Right before your brussels sprouts are ready to eat, add your chestnuts.  Next, add some lemon zest and a squeeze of lemon juice.  Give your dish a stir, then plate and enjoy.

11 February 2014

Curried Cabbage with Raisins

I ignored a head of cabbage for three weeks before I finally decided what to do with it.  A few of the outer leaves had been used for coleslaw, but one can only eat so much slaw per month.  The recipe needed to be easy, quick, and warm, and I finally found something that fit the bill.  I like the sweetness of the raisins, but the recipe is fine without them since you'll get some sweetness from the shallots.  Serve this festive dish over rice with a few other brightly colored veggies.

The great thing about this method of cooking cabbage is that it will be fine with any number of substitutions.  If you don't have curry powder, use garam masala.  Also, if you don't have fresh turmeric, use powdered and reduce the amount to 1 tsp.  Finally, if you don't have mustard seeds, use about two tablespoons coarse mustard and reduce the vinegar a bit, since mustard has vinegar already.  If you do this substitution, don't use a type of mustard with horseradish, as it won't play nicely with the other flavors.


Yellow Curried Cabbage with Raisins
That yellowness is great for stimulating your immune system.  Turmeric for health! :)


Ingredients:

1 tbs cooking oil
1 c. shallots, chopped
3 cloves garlic, minced
1 tbs turmeric, minced
1/2 tbs. cumin
1 tbs mustard seeds
1 tbs curry powder
1 cabbage, sliced
1/4 c. rasins, soaked
1/2 c. chicken broth
1/4 c. apple cider vinegar
Salt and Pepper, to taste
Sliced tomatoes


  1. Chop all the veggies.  
  2. Heat oil in a large skillet (I use a wok), and heat the cumin and mustard seeds until they pop.   
  3. Add the curry powder, tumeric, shallots, and garlic and saute until onions are translucent and the tumeric releases its color.
  4. Add the chicken broth, and once it warms add the cabbage and raisins.  Cook until it is the texture you like, stirring to distribute the color.
  5. Dress with the acv, and add salt and pepper to taste.
  6. Serve over rice, topped with tomatoes.  Enjoy!


06 February 2014

Tomato and Parsnip Soup

It has been colder than usual this week, so I've been craving soup.  This recipe is inspired by the one in The New England Soup Factory Cookbook, and if you like parsnips you'll most likely enjoy this soup.  I love parsnips, but K apparently does not.  Now I have something like four cups of it to myself as of day three.  This stuff is deceptively filling, so I should probably can some of it and expand my collection.  Yes--should.


Tomato Parsnip Soup
Mellow, delicious, warm-you-up-fast goodness.


About Parsnips:

The best time to eat this carrot relative is during winter, as cold temperatures stimulate the plant to produce more sugars to ward off freezing.  This vegetable is very sweet and hardy, so it is one of my favorite winter vegetables.  Some people dislike the radishy/turnipy flavor.  To be honest, I wasn't a fan the first time I had them, but things have changed.

Most of the good stuff is either in or right below the peel, so to get the maximum nutrition from this veg don't peel it.  Speaking of peeling, parsnips brown when cut.  To prevent this, soak freshly cut pieces in cold water, as you would potatoes(this will prevent oxidation).

This recipe makes quite a bit of soup, so I recommend making half of it if you're not sure about parsnips.

 Ingredients:

2 tbs cooking oil
4 cloves garlic
1 large yellow onion, diced
2 ribs of celery, sliced
12 parsnips, sliced
6 cups peeled tomatoes (I used canned)
2 cups tomato or V8 juice
4 cups vegetable stock
1 cup cream
2 tbsp fresh dill, chopped
salt and pepper, to taste

Equipment:

blender
knife and cutting board
large, heavy-bottomed pot with lid


  1. Chop the veggies into pieces--the smaller they are, the faster they'll cook.  This soup will be blended, so don't worry too much about the cutting.
  2. Heat oil in the pot, then saute the fresh veggies for 10 minutes.
  3. Add everything else except for the cream, dill, and s/p, then simmer, covered, for 35 minutes.
  4. Puree the soup.  If you have one, use a hand blender.  If you don't, then work very carefully in steaming hot batches.
  5. Stir in the cream, dill, and s/p.  I added a bit of 100,000 SHU cayenne (which, according to the scale, shouldn't exist), because hotter is better.
  6. Garnish nicely.  I used fresh tomatoes and some cilantro, but would have used fresh dill if there'd been extra.  


24 January 2014

Krishna's Lordly Costume, Part 1: Shirt

Firstly, I have to give praise to my husband for being willing to wear whatever suits my fancy--including ruffles.  I chose well, indeed.

This costume was intended to be an interpretation of something a minor lord might wear.  The outfit was made for Krishna to wear to the Texas Renaissance Festival, and I haven't done much research on male period costume, so it is entirely imaginary.  I think it suits my faire-wear dress nicely.  K picked the fabric himself, and we got a great deal on it.  The pictures don't do the color justice at all, and I don't care enough to edit them.  Take my word for it--it is actually a rich berry/wine shade.

I used the Simplicity 4059 pattern as a base and added some of my own touches to personalize it.  I sewed the outfit with my restored 1940 Model 201 Singer and my 150th Anniversary Singer Model 2638.  There was much more hand sewing than I had expected, but it ended up giving a nice handmade effect, so I didn't mind.  This is the first post of a three part series, each focusing on a different piece of the costume.  Please excuse the dog hair and fuzz covering everything.  You learn to live with it.


Simplicity 4059 Shirt A Hand Sewing on Yoke
Take a look at that beautiful hand sewing!  I loved it so much that I decided to ignore the directions to put it on the inside of the garment.  

First, let's focus on the shirt.  I decided on shirt A, since I didn't want his outfit to look too common, and I think a high collar goes better with a variety of doublet collars.  Krishna is tall and slender with wide shoulders, so fit is always an issue.  It is seriously challenging to find clothes for that man!  For this pattern, the majority of his measurements were between an XS and a S, so I had to make plenty of adjustments.  The sleeves were too short, but I handled that by extending the pattern by an inch and then adding the ruffles.   I also extended the body length by several inches.

I sewed this shirt while K was at work, without making a muslin.  I knew it wouldn't be perfect, but I was feeling ballsy.  Shockingly, the shirt was too tight across the chest and back, which restricted his arm movement.  To resolve the issue, I added diamond shaped gores under the arms.  This had an added benefit of removing the seam from his underarm, which was much more comfortable.  As I understand, it was actually quite common to add underarm gores back in the day, so I wonder why people don't do it anymore.

It took more than one try to get the diamond gores cut correctly because I didn't properly add the seam allowances.  I hadn't worked with a diamond shape like this before, so it was a great learning experience.  Since I had already sewn the shirt, I just ripped out the underarm seam and attached the diamonds.  Couldn't be easier!

Simplicity 4059 Shirt A Tyndall Underarm Gore
It looks wrinkly, but you can't see that while he's wearing it.  I was counting on that fact!

Simplicity 4059 Shirt A Tyndall Underarm Gore Detail
Cute stitching, right?  For me, sewing is all about the little details.


I made the ruffles by cutting a wide strip of bias fabric and then finishing the edges with a 1 cm hem.  Then, I folded the strip lengthwise before running it through my pleating attachment on my 1941 Singer machine.  It took quite a long time to learn to use the ruffler attachment correctly.  I ended up cutting scrap fabric and experimenting with each possible setting, all in a line so I could compare the different effects.  I think this is the best way to learn about new attachments, and recommend everyone try it.  It will cause less frustration if you learn everything before trying to apply it to your garment.

Simplicity 4059 Shirt A Tyndall Wrist Ruffle Detail
The best part about this ruffle is how it looks like two layers, but is actually one piece of fabric.

Continuing on with the cuffs, I didn't use a typical button closure.  K requested that I make it so the sleeves could be pushed up without unbuttoning them, since TX weather is notoriously unpredictable.  I mulled over the problem for a while, then decided to simply make elastic loops.  I made a thread chain to go across the elastic at the edge of the cuff so it wouldn't gape when it was buttoned.  Problem solved.

Simplicity 4059 Shirt A Alternative Cuff Closure
Looking more closely, I wish I had finished the edges on slit in the elastic.  I suppose it isn't ever too late, but honestly, I'm not going to do it unless I have to.

I used the same black velvet ribbon for the neck closure as I did for the striping on the doublet, giving the outfit a nice, cohesive look.  You'll have to trust me on that for now, since I won't post photos of the whole outfit until the series is complete.


Simplicity 4059 Shirt A Collar Detail


In closing, the thing I would most like to change would be to make the collar taller.  It looked proportional before he put it on, and I even worried it would be too tall for comfort, but I shouldn't have.  I guess this is why it is best to continually try things for fit as you sew.  Come to think of it, though, it didn't really look short until he had it on for the better part of a day.  

Considering all of the new things I learned while making this shirt, I think my skills as a sewist leveled up.

Simplicity 4059 Shirt A Complete Tyndall
Here's the finished product!  I have to say that I'm proud of it, wrinkled as it is.  Although I didn't draft the pattern myself, it has enough of my own touches that I feel a real sense of ownership.

19 January 2014

Yulan (Korean Chestnut Dessert)

Korean Chestnut Dessert: Yulan
Chestnuts roasting on an open fire...  The song inspired me to learn to cook with chestnuts.
Aren't these chestnut shaped bite sized snacks just adorable?  Bet you can't eat just one!  They're addictively delicious, and while you may have more self control than I do, they're hard to resist if you like chestnuts.  They best part is that they're incredibly simple to make--so easy, even a child could do it.  Here is the video that taught me to make this treat.


Ingredients:

15 to 20 large chestnuts
Honey
Pinch of salt
Cinnamon powder(for dipping)

Equipment:

Deep Pan 
Medium sieve
Small spoon

  1. Make sure your chestnuts are clean, then cover them with water and boil them for around 30 minutes.
  2. Cut the chestnuts in half, and use the small spoon to scoop out their meat into the sieve.
  3. Press the chestnuts firmly through the sieve to make chestnut flour.  It will look a bit like sawdust, but trust me, it is delicious!
  4. Add a small pinch of salt to bring out the sweetness of the dish, then add honey to your taste and mix.  You don't want it to be too wet, just to come together.
  5. Now shape your chestnut dough into tiny chestnut shapes, and dip their ends in the cinnamon powder.  You're finished.  Yum!

18 January 2014

Kabocha Risotto

Kabocha Risotto
You can see Pan Seared Brussels Sprouts with Chestnuts and the dessert, Yulan, in the background.


I love squash, and of all the squash, I love kabocha the most.  It is a pleasing, radially symmetric green thing of beauty.  Kabocha is a Japanese pumpkin, and if you're living in Japan during the holidays, you can use it to make the best pumpkin pie.  Ever.   If you're stateside, these days it is relatively easy to find in Farmer's Markets, health food stores, and even some of the larger chain grocery stores.  Here in Texas, I've found it at HEB exactly once.

To pick out a good kabocha, you need to keep a key fact in mind.  Just like sweet potatoes, kabocha needs to be cured to bring out its best flavor.  If your kabocha is freshly harvested, the texture and flavor will be substandard.  Therefore, you want to pick a squash with dull skin and a very dry stem.  Also, you should pick an evenly formed squash.  Misshapen squash is usually caused by uneven watering, and nobody wants that.

Kabocha skin is thin and nice to eat, unlike that of my second favorite squash, the Delicata.  The only reason
I can think of to remove the skin when you eat Kabocha is if you don't want the green pigmentation in your dish.  If you steam, bake, or stew Kabocha, it provides a lovely contrast with the pumpkin's orange flesh. The first way I ever ate Kabocha was as tempura. I don't make fried food at home, other than krupuk, so one of the healthier ways I usually prepare Kabocha is nimono (煮物), which is slightly sweetened soy sauce and sake flavored  vegetables stewed in dashi (, だし).

I've been interested in finding other ways to use the delightfully creamy, yet flaky, and sweet pumpkin, so I decided to try to make some risotto with it.  Naturally, I hadn't come up with the idea first, and my recipe is based on this one that I found at the Amateur Gourmet site.  It is über delicious.


A friendly reminder:  Always completely read the instructions before beginning any recipe--including this one.  If you're careful to get the timing right you can significantly reduce the time it takes to make this recipe in particular.


  1. Chop the onions and start caramelizing them.  Do it now!  Cutting the squash will take a while, but not nearly as long as properly caramelizing your onions.  In a large non-stick pan, add a bit of oil and the onions.  Cook on low as long as you can--30 minutes at the absolute minimum.  They will turn a deep golden color and smell like oniony heaven.  Caramelized onions are the gold of Western cooking.
  2. Halve and de-seed the squash, then cut into crescents.  Peel the crescents, then cut into 1cm wide pieces.  For the love of your fingers, use the sharpest knife you have.  Sharpen it right before you cut the squash if you can!  Blood isn't without nutrition, but we're going for a nice light color with this risotto, and cutting open your hand will ruin it.  
  3. Add the water and stock to a pot and bring it to a boil.  Use the best chicken stock you can get.  I make my own double strength stock with a pressure cooker and can it, but I suppose you can buy yours.  It won't taste as good, though.
  4. Simultaneously, in a covered iron skillet, steam the kabocha on low for a few minutes.  Then, turn up the heat and lightly sear the pieces.  Remove the pan from the heat before the kabocha is done.  It will continue cooking because of the iron skillet's high thermal capacitance. 
  5. Add the rice to the onions and cook until it is slightly translucent, then add the marsala.  Once it is absorbed, add the stock one ladle at a time, gently stirring and allowing it to absorb before each subsequent addition.  Adding the liquids slowly will prevent you from making watery risotto.  You don't want it to be too thick, but it is better for it to be too thick than for it to be too watery.
  6. Your risotto is nearly done.  Add the sage, toasted pine nuts, cheese, and stir to combine.  Plate, and garnish with more sage and pine nuts.  Lovely!

I served the kabocha risotto with pan seared brussels sprouts with bacon and chestnuts.  So delicious!

16 January 2014

Kong Jang (콩장): Korean Sweet Soybean² Side Dish

Kong Jang


There are different ways of making Kongjorim, but I like to go the health-nut tree-hugger route, meaning no overly processed ingredients.  And, true to form, I also follow the incapable-of-planning-ahead route of not soaking the beans overnight.  If you don't have honey, you can use 1/3 cup sugar instead.


Ingredients:
1 cup dried soybeans (black or tan is fine)
2 cups water
2 tbsp chopped garlic (I usually leave the smaller cloves whole)
1/3 cup soy sauce
1/2 cup honey (more or less as you like)
1 tsp cooking oil
1 tsp toasted sesame seeds
a sprinkle of sesame oil


cooking kong jang


  1. So, now that you're jonesing for this deliciousness, go ahead and add your soybeans to your water and soak them for 1 hour.  Yeah, I know--there's a bit of time involved, but it could be worse.
  2. Dump the beans and water into a saucepan, then bring to a boil.  Cover it, then reduce the heat enough that the foam won't boil over. (On my stove, this is just one setting above simmer.)  Now ignore it for 15 minutes. 
  3. Add the garlic, honey, and cooking oil to the pot.  Why add cooking oil at this point?  It keeps the bean foam from boiling over and giving Mr. Clean nightmares.  Give things a good stir, and vigorously simmer uncovered  for 20 minutes, stirring as frequently as you can bother.  For me, this is about every 3 minutes.  The trick is to keep the beans moving and if your heat is set correctly this will happen automatically, at least until the water level decreases too much.
  4. Cook until most of the liquid has evaporated.  At this point, you'll have to start paying attention or the beans will burn.  Stir them lovingly as long as it takes.  The softness of the bean depends on how much liquid you let evaporate.  Leave more liquid for a softer bean.
  5. Your beans are now glossy, wrinkled, and delicious smelling.  Add the sesame oil, stir, and plate.  You may want to add extra honey, or you may not.  Garnish with sesame seeds.  Eat!


A word about pan choice:  I use a small nonstick saucepan with a diameter wider than the height of the vessel for this recipe.  You need to balance between high sides and large surface so area the beans won't boil over, and so it won't take forever for the liquid to evaporate.  Choose your weapon wisely, because cooking time will be affected more than you might think.

As for bean choice, get the best quality available or you'll find yourself spending too much time picking out the bad beans.  When eating in restaurants I've always had this with black soybeans but, since I can't easily find them at a good price, I use tan soybeans.  If finding dried soybeans of any color is an issue, try making the dish with black beans (your typical frijoles negros).

In closing, I like my kong jang with most of the water evaporated, until the beans are quite chewy and the sauce is more like a glaze.  If you want them softer, try soaking the beans overnight and add the soy sauce after you've evaporated some of the cooking water.  Either way, these keep well in the fridge for a while.  How long?  I've heard two weeks, but I really don't know, since we always eat them all before they've gone off.

15 January 2014

Big Bend National Park: Hot Springs After Hiking, Anyone? (Day 3)


Big Bend National Park: Emory Creek Trail
Magnificent view from about two miles into the Emory Peak Trail


I have done a decent amount of hiking/trail running in the Smokies, the Rockies, on Oahu, HI, in other State/National parks around the country, and even in Ireland.  That's not to say I'm particularly discriminating, but if you're looking for a short day hike that will rank in the top of your memories, try the Emory Peak Trail.  It is about 10 miles round trip, unless you're over confident and go two miles out of the way due to not needing any stinking trail signs, like me.  Yay for extra work outs!  Don't expect to make very good time on the way up, because pretty much everything is uphill with an elevation gain of 2400 feet over 5 miles.  I'm sure people who can run the whole way exist, but I'm certainly not one of them.  I run the flattish parts, and of course the downhill.  That's why I don't have pictures going back down.

Big Bend National Park Mexican Jay
This fearless Mexican Jay flew down beside us and hopped closer and closer, until he decided to get eye level about 3 feet from me.  I felt like a Disney Princess, albeit a very dirty and tired one.


Big Bend National Park Emory Peak Trail Running
Maybe he was just trying to point out how well we matched.

We saw plenty of other birds, and also a young buck on the trail.  None of the animals seemed concerned about our presence.  When we saw the deer, he waited a little while, lost interest, and just sort of wandered away.  There were also a few horseback riders, at least up to the campground.

Once you make it to the peak of the trail you'll have to do a little bit of rock climbing.  It isn't anything major, but it you have a fear of heights it may not be the best thing for you.  There are actually two peaks, and I tightened my shoelaces and went up both of them.  Krishna stayed below due to common sense and the heebie-jeebies, which allowed him to take this picture of me leaning over about 2/3 up the shorter peak.  


Big Bend National Park Emory Peak Summit
Once I made it to the top, I realized I had picked the shorter of the two peaks, so I had to go up the second one too.


Big Bend National Park Chisos Basin from Emory Peak
Aah, that's better.  You can just barely see the Chisos Basin Campground and Visitor Center on the right.

U.S. Cost & Geodetic Survey Marker 1934 Emory Peak Big Bend National Park
This was at the far end of the Emory Peak summit.  You'll find it if you're looking for the best vantage point to take pictures of the Chisos Basin.
Nowadays, the U.S. Coast & Geodetic Survey is called the National Geodetic Survey, and, according to Wikipedia, is responsible for the National Spatial Reference System, which is way cooler than it sounds at first.  If you're interested in learning more and possibly being filled with gratitude, check out this page.  I didn't even know it existed until I found this marker and looked it up.  

Krishna and Tyndall at the top of Emory Peak in Big Bend National Park
I'm having a blast, and he's having heebie-jeebies.  I wish he wouldn't worry, but I guess that's just twue wuv.

After taking this picture, we beat a hasty retreat down the mountain and headed to the hot springs.  This time we made it there before sunset!  There is a bit of a drive to the short hot springs trail.  It may make you nervous, wondering "Just how far am I going to have to walk to get to this spring," but don't worry, it is only about half a mile.  As a plus, you can see some ancient pictographs at the top of the cliff if you look closely. 


Big Bend National Park hot springs trail
Not pictured: pictographs.  This is, however, a pretty good preview of the hike you'll encounter on the way to the hot springs.  Flip flops are just fine, but your feet will get sandy on your walk back to the parking lot.


 Also, I discovered that the abandoned buildings have murals that are worth checking out, particularly if you love kitsch.

Big Bend State Park Hot Springs Abandoned Building
These were lodging for the now defunct health retreat's patrons.  Each room has a different mural.

We got to watch the sun set, and as the temperature dropped things got steamier and steamier, interfering with pictures.  We're sitting right by the intake, where the water is the hottest--about 105°F.  The walls of the hot spring keep out the Rio Grande's chilly water.  As you can imagine a desert river would, the water level changes pretty dramatically depending on rainfall, so you will probably have a different experience every trip.  


Big Bend National Park Hot Spring Sunset
This is definitely the best picture spot in the spring.   Also, the warmest.  Score!


The best part about the spring's setup is that once you get too hot, you can go for a cold plunge in the Rio Grande.  It's tough the first time, but it gets easier each time.  


Big Bend State Park Hot Springs Rio Grande Cold Plunge
So cold, but oh, so good--particularly once you get back in the hot water!

We stayed to watch the sky for a long while, and I saw a shooting star!  We would have brought our bottle of champagne with us, but alcohol is prohibited here because of the health risks involved in drinking too much and getting in really hot water.  It is a prudent idea, but I really think we would have been fine if we sat away from the hot water outlet.  We hung out for a while in the spring and met a family from India who were super friendly and entertaining.  It was fun to not be the only white girl around married to a Krishna.

The night was young, but we ended up heading back to camp and having Soto for dinner.  Soto is deliciously spiced Indonesian chicken soup; I highly recommend you try it if you ever get the chance.  We were so warm from the hot spring that we didn't try to cook in the tent this time.  What an improvement!  We brought in the New Year with champagne under the stars.  Despite not being able to drink it in the hot springs as we had planned, I have to say this has been my favorite New Year's celebration to date.  It was health oriented and completely stress free.  Sure, we were sore from the hike, but it was a satisfying kind of sore, mitigated by the mineral water soak.  


< Day 1     Day 2

14 January 2014

Big Bend National Park: Hot Springs After Hiking, Anyone? (Day 2)

Big Bend National Park Old Ore Road Tinaja Top View
Top view of unnamed Tinaja off Old Ore Road.


The part of our night that wasn't spent trying to stay warm in our very ventilated tent consisted of trying to calm our ever vigilant dog, Ria.  She hadn't been camping in a while and was on pins and needles every time the wind gusted, which was about once every two minutes.  We slept in, and then made fried eggs and root veggie hash inside the tent.  This left us warmer, with an added bonus of a steam bath in eau de potato.  Ha!

After some bike maintenance, we headed to Old Ore Road.  It is a 26 mile point to point ride.  They say allow 3 hours for driving, but those estimates are for 4WD vehicles.  You can do it faster on a motorcycle, of course, but you probably won't, since there are so many views that are pause-worthy.  My favorite part of the ride was stopping to explore a small canyon that had been polished smooth by rushing seasonal waters, called a Tinaja.  There are other, bigger tinajas to see in the park, like the Ernst Tinaja, but we had this one all to ourselves.


Big Bend National Park Unnamed Tinaja
This was part of my view as I snacked on a Clif Bar in the unnamed tinaja.  So pretty!


As we continued down Old Ore Road, we encountered several SUV's.  Most of their drivers let us pass by, but others didn't catch the hint.  We also ran into a caravan of photographers from Houston driving identically decked out Toyota FJ Cruisers, and one fellow was nice enough to take the following shot of us.


Big Bend National Park Old Ore Road Impressive Geological Formations
This part of the road ran below an impressive ridge with some beautiful geological formations.

We rode a few more miles, and then found ourselves on top of a very large hill with a lovely view.  The rest of the ride was nice, but rather flat.


Big Bend National Park Old Ore Road Highest Point
This was the highest point on the Old Ore Road, and the view was gorgeous.   

We had intended to stop by the fossil exhibit on the way back to camp, but time was short and we wanted to make it to the hot springs before dark, and we still had to stop for gas.  Hurrying in general makes me cross, but after passing on the exhibit, hurrying to the spring, and getting stuck behind what felt like the slowest driver of all time we arrived in the parking lot just after twilight.  By the time we were at the spring, it was pitch black.  Oh yay!


Crazy hair lady is not impressed.


My grumpy face didn't last very long, though, because the water was so relaxing, and there were so many people having fun in the hot spring that night!  I had no idea it would be so popular--it was hard to find a place to sit.  I guess I could have been disappointed at all of the extra company, but I was thrilled to know that I wasn't alone in my affinity for hot springs.

As a bonus, that night was a new moon, so the star gazing was dazzling.  No, I'm not over exaggerating--it was truly spectacular.  Big Bend National Park is one of the best places in the country for star gazing for several reasons.  Firstly: you aren't near any sources of light or air pollution.  Secondly: deserts are dry, and places that are dry don't get many clouds.  Thirdly, down by the river there isn't a lot of vegetation or other view obstructing, well, anything.  I am convinced that we picked the best time to go star gazing in Big Bend, and I'd encourage you to do exactly what we did.  It is an incredibly beautiful and romantic way to enjoy a long winter's night.


13 January 2014

Big Bend National Park: Hot Springs after Hiking, Anyone? (Day 1)

Big Bend National Park River Road East View
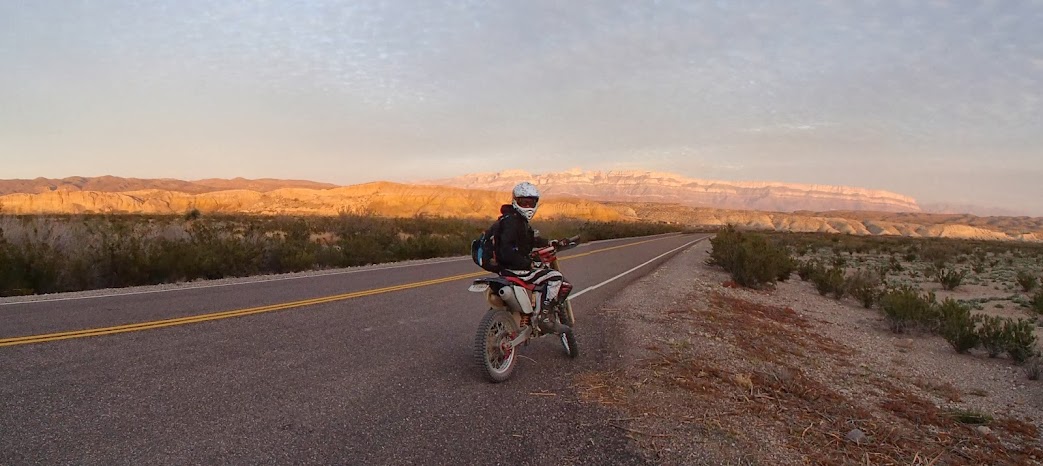
There are two dirt bikes in this picture, but you really have to look for them.


K and I spent New Years at Big Bend National Park.  We thought, "What better way to relax and connect with the natural world than to go ripping through the desert on dirt bikes?"   It'd be a tragedy to live a full year in TX without having that experience.  I first learned of the park while looking for natural hot springs open to the public, and although the pictures weren't particularly inspiring, I knew I had to make a pilgrimage.  I didn't even check out any of the scenic pictures, which turned out well because I had no expectations going into the adventure.  Everything was fresh and new, at least to me, and I wouldn't have wanted it any other way.  Access to the park for 7 days cost us $20 for the car and included K's bike, and an additional $10 for my bike.  It was super nice of them to let us use the car pass for K's bike.

The park, though massive, was surprisingly busy. I would definitely try to make reservations if I were going in the spring or fall.  Site #31 was surrounded by scarily thorny mesquite trees and well protected from the wind, as were most of the sites in that corner of the campground.  That corner of the campground is excellent for people with trailers or more than one vehicle because most of the sites have pull through parking.  None of the Rio Grande Valley sites have electricity, but they all have bear lockers and grills.  Speaking of bears, Yogi doesn't seem to be that interested in campers anymore.  If you're negligent in putting away your food, you may be visited by some javelinas, though.  Camping was $14 per night.  The views are epic, and the campground is close to the natural spa, so I consider this a massive win.


Day 1

The day was spent making camp, and finally riding the River Road East to Black Gap Road, then home.  You read that right--camp = home, because home is where the dog is.  While the scenery from the River Road East was beautiful and interesting, the riding itself wasn't a challenge.  I was hoping for trails, or at least unmaintained old dirt roads.  I recommend it whole-heartedly to someone who hasn't been off the pavement yet.  River Road West is supposedly more challenging, but we didn't make it this trip because of range issues.  K needs to get a bigger tank, and I wouldn't mind one myself.

Big Bend National Park River Road East Detail of Road Quality and View
The gravel River Road East had some sandy parts, but otherwise was oh, so smooth.

Big Bend National Park: Interesting Geological Formation on River Road East
This part of the River Road East was curvier, and had interesting geological formations.

I couldn't help wanting more, thinking, "Is this it?"  Riding in Breckenridge has spoiled me!  Not to worry: Black Gap Road was much more interesting, and I rode for all I was worth.  I think I freaked K out a bit, since he's not used to following me.

Big Bend National Park Sunset where the River Road East meets the pavement
This is where the River Road meets the pavement.
The sunset was glorious, turning all the rocks shades of pink and purple.  It affected us, too-- turning us into meat popsicles on our way back to camp.  All was well once we tucked into the lamb, barley, and parsnip stew I had canned earlier during the holidays.


Big Bend National Park Tunnel near Rio Grande Village
Passing through the tunnel on the way back to camp during a fabulous sunset.


Day 2     Day 3 >

07 January 2014

On the Conquering of Mountain Passes in Breckenridge, Colorado by Dirt Bike in 2012

I wrote this in the summer of 2012 and totally forgot about this post until today.  Whoops.

Krishna did something amazing.  As my birthday present, he secretly arranged for us to take a trip out to Colorado to go dirt bike riding with a bunch of his racing buddies.  My hubs knows me so well!  :)

We ended up staying in an impressive chalet that could sleep something like 20 people comfortably.  The owners were apparently big hunters, because there were trophies in every room--including a moose in the great room.  Let's just say it grew on me.


I had no inkling of what a terrible rider I was until I tried going off-road.  I spent the first 3 days with a death grip on the handle bars, but at least I didn't get nervous and yak in my helmet.  That's a plus, right?


Fearless and manipulative little rodent.  He ended up making a show of perching on one of our buddies' boots, and in return he got crumbs of cliff bars.  No doubt we killed the poor creature with our handouts.


A beautiful scene in Alma, CO--the highest incorporated town in the country!  (2014 edit: Probably not anymore.  Hah!)


Insert cliche statement about bridging the gender divide.


Yeah, it doesn't look like it, but the climb up was tough (at least, for me).  I'm positive that SUV came up a different road than we did.


This was my first water crossing ever.  I balanced with my feet in the air and didn't get wet.  Amazing!


I have such great friends.  Thanks for the perfect commemorative chocolate!


These are my favorite directions.  I'll have to get myself more of this.  Also, more chocolate.